My blog has moved!

You should be automatically redirected in 6 seconds. If not, visit
http://noelleodesigns.com
and update your bookmarks. Thanks!

14 March 2011

ladies weekend

Phew,  just back from a whirlwind trip to So Cal with the ladies. We did a little relaxing at the beach house and a little running around the Southland... a much needed get away from the monotony of winter and everyday life.

Sunday, we made our way to Pasadena- to the Rose Bowl Flea Market. I have never been to this gigantic, exhausting spread of bric-a-brac... I think I'm in love. If only there were more hours in the day, days in a lifetime...

Treasures aplenty- we were all wishing we'd driven a moving truck instead of flown to CA. Now I know where to go (with that moving van) when I'm ready to do some redecorating. 
 The variety of goods and people on display, my oh my... sunny skies above and a day of hapless wandering- smiles all around.

09 March 2011

a nappy bag


Just finished this specially ordered diaper bag for a local gal. I haven't made any bags since the move.  I had to fumble around the new sewing room looking for all the elements of bag making for quite awhile before I got everything organized, lots of muttering "now, where did I put those... magnetic snaps, zippers, straps and hardware, plastic canvas..." going on.

I've been recently deciding to mix up the fabrics and colors on the outside of the bag, no more "party in the back, business in the front"---> now it's party everywhere/all the time.

This canvasy striped fabric on the inside is super duro, for outdoor furniture I think. You could probably wipe it all down with a wet cloth daily if necessary. Like if your precious little one spit-up in there, baby food spill, diet coke mishap, dirty nappy temporary storage...  


07 March 2011

covered buttons

This is one of the reasons you should never throw away any scrap of fabric, no matter how small.

04 March 2011

why do we even own these books?

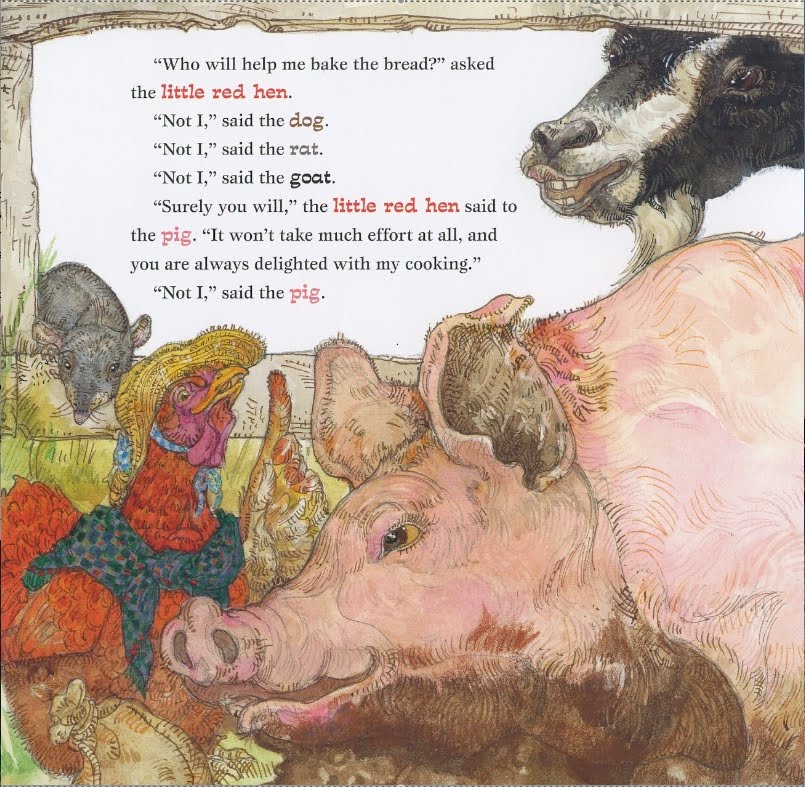
I am mostly talking about The Little Red Hen here. Every time I read this book with the kids I start getting all fired up. If you don't know what I'm talking about- here is a sample page, and the theme of the book...
The hen is trying to persuade her lazy friends/family to pitch in a little to grow, harvest and mill the wheat to make bread. She gets denied over and over again from every single barnyard companion. Is this speaking to anyone else out there? Any other mothers feel my pain... picking up what I'm laying down? 
This.Is.The.Story.Of.My.Life.
Everyone wants hot, fresh bread, but no one wants to help make it.
deep breathe... then exhale...

Then there is Frog and Toad, a couple of simpletons- but then again what did you expect? They are just amphibian amigos, (they're luck to have a book series...) trying to have a little fun. I have to laugh, admittedly out of jealous spite, whenever we arrive on the page of Frog's list of Things to Do.
I have a hunch Pierre's list of Things to Do is even shorter than Frog's.

02 March 2011

sportswoman

The other Ann Taylor... ski racer (invited to ski in 1940 Olympics), pilot, horsewoman, designer of ski clothing, wife, mother, socialite- girl, you got it going on.

01 March 2011

Hey, get off the shed!

This shed, inelegantly deposited in the sideyard of our house, (our petite substitute for a third garage bay)- lovingly nicknamed the "Outhouse" or "Sport Shack" has been calling F's name since he first set eyes on it. I missed the vision of what exactly he was planning until I went outside yesterday and found this scene unfolding. Oh well, if you can't beat 'em join 'em- Steve O climbed up too and helped plan the big jump. 


A small crowd gathered- our whole family and the young, impressionable Calderwoods' risking the cold to watch the scene unfold and embed some fresh ideas of how to behave when they turn 13 or so. 
Thank goodness he had his helmet on... what a good example.

Special thanks to the Calderwoods' for reminding us of this Saturday Night Live skit, we are so glad you are big SNL fans too and that you're the kind of neighbors to applaud this type of behavior, or at least turn the other cheek and not call DCFS. 

25 February 2011

An image from the archives

I know I've mentioned it before, and it's embarrassing to admit again but- I'm back at it. That wretched, time consuming task of cleaning up the iphoto on my computer. It's just that hitting the 'delete' key is so final.
Although, deleting is getting easier. Just like having a yard sale in the right mood can really get rid a lot of the excess stuff from around the house.
Here is my new philosophy on photo archiving:
-instead of lumping everything onto an external drive I am:
1. Deleting all photos except the very best-of-the-best to be saved. It is not worth saving all the pictures I've ever taken, no matter how crappy, to perhaps lose the ones I really love due to a jam-packed aging storage devices.  I heard that information saved in disc format has a shelf life of about 5-6 years before data begins deteriorating. Scary.
2. Label everything, I am putting all (saved) pictures into iphoto albums so that they can be saved in categories and I can actually find the picture I'm after when I want to---> later on.
3. We have started storing photos and information on external hard drives instead of discs.  Seagate makes a good external drive, available everywhere (Staples, Best Buy or Office Depot) very easy to use, tons of storage and recommended by the film boys, like Steve O.

24 February 2011

Tutorial: Making a fleece flower

You will need: brightly colored fleece, 10 or so small beads, embroidery floss (or regular thread), a large needle and a pair of scissors.


Step 1. Cut 5 circles out of the fleece, begin with the largest flower being about 3 inches in diameter, and  each circle continually getting slightly smaller.
Step 2. Cut notches around each layer of circle to make the edges of the fleece circles look like flower pedals, be sure to round the edges of your cuts.
Step 3. Stack the circles on top of each other and place the flower stack on the side of the hat, or wherever you would like it to be sewn.

Step 4. With the embroidery floss threaded into the needle, sew the beads into the middle of the flower. With a knot in the end of the thread, begin inside the hat and sew up through all layers of the hat and flower, adding a bead for every stitch. These stitches will sew the flower to the hat and finish the inside of the flower- all in one easy step.


Tutorial: Making a fleece hat


You will need: Two pieces of fleece, the piece for the main body of the hat (shown here as dark green) 21 inches long by 8 inches wide.  The piece for the band or lining of the hat (shown here in gray) 21 inches long by 3 inches wide.
*Click on any of the images to make them bigger.*

*Fleece has some stretch to the fabric, Make sure the you cut out the fabric with the most stretch running the length of the hat, that way it will stretch to fit around the head.

                                       
Step 1. Place the lining piece (gray) on top of the main hat piece (green) and sew along the edge, about 1/4 of an inch from the edge.
*Remember the fleece is stretchy, and the top (gray) piece may be pulled through by the machine faster or slower than the bottom (green) piece, so take your time and make sure the two piece are matching up as you finish the seam. To help the ends match you can ease the fabrics by stretching one or the other and use the elasticity to your advantage or for certain matching-  use pins to hold the fleece in place as you sew the seam.

 Step 2. Now fold the hat in half length-wise, right sides together, matching the seams where the lining band meets the main hat fabric (green). Open up the green/gray seam flat so that the existing seam will be nice and flat, fewer layers to sew over. Sew along the entire edge, about 1/4 of an inch from the edge. This will be the seam on the very back of the hat.
*Don't worry if the tricky seam you sew over during this step ends up with the inside folded this-way-and-that, it will be inside and never visible.

Step 3. Stand the hat on end, you are looking at what will be the top of the hat. Fold the top edges to form four equal parts.

Step 4. Take 3 of the parts and hold them together and out of the way. They can be pinned together to keep them neatly folded and out of the way. The hat is still inside out, right sides should be together.

Step 5. Measure 4 inches down from the top on the outside edge of the hat, mark with a piece of chalk or a pencil. Mark the center of the hat, 1/4 of an inch from the top (a seams width) with chalk or a pencil. Chalk or pencil in a slightly curved line between these two points. Sew along this line, and repeat for each of the four sections, holding the other three sections stacked up and out of the way while each one is being sewn.

The hat should now look like this when all four sections have been sewn together.

Step 6. Trim off the excess fleece from the seams you have just sewn. When you trim, leave at least 1/4 of an inch of extra fabric between your scissors and the seam you have just sewn.

Turn the hat right side out and the top of the hat should look like this, nicely curved to fit someone's head.

Step 7. Fold the gray lining up into the inside of the hat, leaving about 1/4 of an inch of gray visible from the outside and creating a second layer of fleece on the inside of the hat, and across the forehead. Pin the two layers of fabric together and the inside layer in place.

Step 8. Starting in the back, sew through both layers, 2 inches in from the bottom edge of the hat, all the way around. 

*You can sew right over the pins- it's not very often the needle hits the pins. I like to remove the pins just before I'm about to sew over them, pins often bend when sewn over and on the off chance you hit a pin straight on with your needle, the needle will likely break. Removing pins before they are sewn over is a good habit to get into.

The inside of your hat should look like this. You can choose to trim the lining closer to the seam you've just sewn or leave the excess (gray) lining to leave the hat a bit thicker and warmer. 
Turn the hat right-side out and put it on- just leave it plain or jazz it up with a flower.

*The great thing about working with fleece is that unfinished edges can be left unfinished, they will never fray or unravel.

For instructions on how to make the flower, follow me...


23 February 2011

olympic day

Today---> the 2011 Soldier Hollow Charter School Olympics. The school is located on the site of the 2002 Olympic Nordic ski events at Soldier Hollow Resort in Midway UT. Leaving behind a venue just itching for another Olympic event. Here are the teams getting ready to ski into the stadium for the opening ceremonies. 
During the winter months the students of Soldier Hollow get to ski twice a week during school- a program I'm a huge fan of- equipment from the rental shop, instructors and use of the world class facility- it doesn't get better than that for winter physical education. So, come February, you've got a whole school of skiers who can manage great on a pair of cross-country skis.
I stopped taking pictures when Steve O showed up with his camera, thinking he was snapping stills. I didn't find out until later that he was only shooting video. Now, I don't have a single pictures of the teams making their big opening ceremony debut in the stadium, a slight that left every parent verklempt. Shucks.

Here is C's 1st grade class, team Mexico-- looking so stinkin' cute with the boys in their sombreros and girls in their flower hats. This is the first year my kids have been at Soldier Hollow so I didn't really know what to expect- but I soon heard each team would need some sort of getup... right up my alley- I volunteered to costume-up team Mexico.

I made up these fleece hats for the girls, super fast and easy, (stay tuned for a how-to on these hats later this week) and made with fleece I've had in my sewing room for years. I sewed 12x18" fabric flags to the front of each team member's bib, and a sharpie drawn and colored strip of fabric with the word "Mexico" sewn to the back.

It was great to see all of the kids and their teams outfitted so cleverly- a few favorites ---> a member of the Scottish team, I hadn't even thought of face painting, gotta love the kilt.

Team Germany rocking the paper bag lederhosen.


Here's our M of team Norway, finishing up the obstacle course. This might not look so hard, but remember, she's got skis on. The older kids (2nd through 8th grade) competed in the biathlon, obstacle course and relay. The kindergartners and 1st graders events were a slalom course, beanbag toss, obstacle course and relay.  Once again, bummed I don't have a single shot of kids shooting guns in the biathlon. But we do have some video...

18 February 2011

always be Knolling...

A newish sort of word, used (and I think coined) by Tom Sachs in his 'Working to Code'  film made by the Neistat Brothers,  Knolling is the process of arranging like objects in parallel or 90 degree angles as a method of organization.
The film, 'Working to Code' is a lengthy 21 minutes, that will keep you smiling the whole way through- a glimpse into other folks personal space- including the space between their ears is always filled with awe and wonderment.
I can't help thinking, knolling is the slightly OCD cousin to what I (the Mom) do everyday- I need to coin a word here... There should be a film made called "Living in This House to Code" (for kids and some spouses too...) involving precise instructions on how to pick up after yourself in the kitchen, bathroom and your own room- then specifically how to throughly clean all of these spaces by yourself. Or even a film called "Afterschool"- (I can dream, can't I) I think you can imagine what it might include- specifics on homework, snacking, practicing instruments, friends, facebook, sport practice. I could then happily cancel my weekly, parental, motivational lecture series, short yoga breathing sessions and eye rolling practice and just set all the cherubs/hooligans down to re-watch the film whenever they conveniently forget what comes next.
Speaking of youngsters... F, my second oldest turns 13 today. Two teens in the house- it's funny and scary how fast time moves, the older you get. We're lucky to have such a amazing fella- full of energy- as you can see here, (Grandma Jan and Grandpa Owen can appreciate this picture) smart as a whip and funny too. Happy Birthday dude!
Looking forward to a long weekend in St. George, watching the birthday boy play soccer and relaxing too. Have a great President's Day weekend.

16 February 2011

LOL

I don't know why this made me laugh so hard, so hard I started to cry- (what does that say about my emotional state?) I was scrolling through the many funny misunderstandings and text bloopers on Damn You Auto Correct when I came across the text above... even the next day, when I showed Steve O- I was still laughing that too-hard-people-are-starting-to-stare kind of laugh.  See for yourself folks, and who hasn't had a bad auto correct moment?

15 February 2011

while my Valentine was out


My Valentine spent the weekend in NY and passed this subway street art or graffiti- thanks for the giggle Dear.


For some more mustache oogling, gather your friends around and check out more very entertaining and inspiring (for all you beard growers out there) images from the The World Beard and Mustache Championships here.

14 February 2011

Be My Valentine

Here are some vintage Valentine wishes for you, Valentines that might keep you guessing-
I'm feeling faint... losing a lot of blood with this creepy Valentine.


I hope this was a special valentine purchased for that one special someone, not purchased in a box of 35 for your whole 3rd grade class, breaking hearts all over town with the promise of 'some day'.


More like... "Hey Valentine, I need a nappy change- on the double?!"

So, what is going on here? Is he trying to say, "I may be a chubby kid, but I promise to slim down when I become a man", so please be my Valentine?


I think this is really a waterhorse dressed as a frog, a salamander in shorts perhaps...


Didn't you play 'court' when you were little, right after that tea party? I'm seeing a little role play coming on...


So cute, I'd like this a wallpaper somewhere in my house.
Happy Valentine's Day everyone!

11 February 2011

kid note

I found this note/drawing among M's (10 yrs.) papers. Purely fictional she assures me... but I want the story on John and his gal Jen R. and where does she get her nails done?

LinkWithin

Related Posts with Thumbnails